# Quickstart

> Turn your CrewAI Flows into an agent-native application in 10 minutes.

## Start with your coding agent [#start-with-your-coding-agent]

Use this prompt to connect your CrewAI agent to CopilotKit and verify a working conversation. Your coding agent will follow this guide in your project, or you can work through the manual steps below.

<PageAgentPrompt />

## Prerequisites [#prerequisites]

Before you begin, you need a [CrewAI Flow](https://docs.crewai.com/guides/flows/first-flow). It can run locally or on infrastructure you manage; a CrewAI Enterprise deployment is optional. If you use the CopilotKit CLI path below, the starter creates the Flow integration for you.

The CLI starter also needs:

- Node.js 20.9+
- Python 3.10 to 3.13
- [uv](https://docs.astral.sh/uv/)
- An OpenAI API key

## Getting started [#getting-started]

<Steps>
<Step>
    ### Optional: Set up CopilotKit Intelligence [#optional-set-up-copilotkit-intelligence]

    <SignupLink surface="docs_crewai_flows_quickstart_step1">Start cloud-hosted setup</SignupLink> and create or select a project if you want persistent threads and the inspector.

    - The CLI's `init` flow writes the server-side project API key to `.env` as `CPK_INTELLIGENCE_API_KEY`.
    - Cloud-hosted setup does not issue `COPILOTKIT_LICENSE_TOKEN`.
    - You do not need a Copilot Cloud account to run a local CrewAI Flow with CopilotKit.
</Step>

<Step>
    ### How do you want to get started? [#how-do-you-want-to-get-started]

    Bootstrap with the new CopilotKit CLI (Beta) or code along with us to get started.

    <TailoredContent
        className="step"
        id="path"
    >
    <TailoredContentOption
        id="cli"
        title="Use the CopilotKit CLI (NextJS only)"
        description="I have a Next.js application and want to get started quickly."
        icon={<SquareTerminal />}
    >
        <Step>
            ### Run the CLI [#run-the-cli]
            Run the following command in your Next.js application:

            <Accordions>
                <Accordion title="Don't have a Next.js application?">
                    No problem. Just use `create-next-app` to make one quickly.
                    ```bash
                    npx create-next-app@latest
                    ```
                </Accordion>
            </Accordions>

            ```bash
            npx copilotkit@latest init --framework flows
            ```

            The starter uses a regular CrewAI Flow.
        </Step>
        <Step>
            ### Start the app [#start-the-app]

            In the project directory, copy the example environment file:

            ```bash
            cp .env.example .env
            ```

            Set `OPENAI_API_KEY` in `.env`. Then install the dependencies and start the app:

            ```bash
            npm install
            npm run dev
            ```

            `npm install` also installs the Python dependencies of the Flow with `uv`. `npm run dev` starts the UI and the Flow server.
        </Step>
        <Step>
            ### Talk to your agent [#talk-to-your-agent]

            You've successfully integrated a CrewAI Flow agent chatbot to your application. Depending on the
            template you chose, you may see some different UI elements. To start, try asking a few questions to your agent.

            - Can you tell me a joke?
            - Can you help me understand AI?
            - What do you think about React?

        </Step>

    <Step>
        ### Open Inspector and confirm setup [#open-inspector-and-confirm-setup]

        On localhost, click the Inspector button in the corner of the app.

        1. Open **Inspect**, then **Agent**. Your agent is listed.
        2. Send a chat message. Open **Inspect**, then **AG-UI Events**. Events are moving.
        3. Open **Rich Threads**. The list is unlocked (Intelligence is on), or locked with **Copy setup prompt** (Intelligence is off).

        More detail: [Inspector](/crewai-crews/inspector).
    </Step>

    </TailoredContentOption>
    <TailoredContentOption
        id="code-along"
        title="Code along"
        description="I want to deeply understand what's happening under the hood or don't have a Next.js application."
        icon={<SquareChartGantt />}
    >
        <Step>
            ### Expose your Flow as an AG-UI endpoint [#expose-your-flow-as-an-ag-ui-endpoint]

            CopilotKit connects to agents over [AG-UI](https://docs.ag-ui.com). A CrewAI Enterprise Live Automation URL or another plain CrewAI endpoint is not automatically AG-UI-compatible, even if it returns HTTP 200. Add the official CrewAI adapter to the service that hosts your Flow:

            ```bash title="Terminal"
            pip install -U "crewai>=1.15.11,<2" ag-ui-crewai fastapi uvicorn
            ```

            ```python title="server.py"
            from fastapi import FastAPI
            from ag_ui_crewai import add_crewai_flow_fastapi_endpoint

            from flow import YourFlow

            app = FastAPI()

            add_crewai_flow_fastapi_endpoint(app, YourFlow(), "/")
            ```

            Start the server locally with `uvicorn server:app --host 0.0.0.0 --port 8000`, then deploy it to a public HTTPS URL that Copilot Cloud can reach.

            This path connects the Flow through Copilot Cloud, so the Flow must have a public HTTPS URL. To keep the Flow local, use the CLI path, or register the Flow with an `HttpAgent` in your own [Copilot Runtime](/crewai-crews/backend/copilot-runtime).
        </Step>

        <Step>
            ### Verify the AG-UI stream [#verify-the-ag-ui-stream]

            Before connecting the frontend, send one run directly to the deployed endpoint:

            ```bash title="Terminal"
            export AG_UI_URL="https://your-service.example.com/"

            curl --fail-with-body --no-buffer --include \
              --request POST "$AG_UI_URL" \
              --header "Content-Type: application/json" \
              --header "Accept: text/event-stream" \
              --data '{
                "threadId": "preflight-thread",
                "runId": "preflight-run",
                "messages": [
                  {
                    "id": "preflight-message",
                    "role": "user",
                    "content": "Say hello"
                  }
                ],
                "state": {},
                "tools": [],
                "context": [],
                "forwardedProps": {}
              }'
            ```

            A compatible response has a `Content-Type: text/event-stream` header and emits `RUN_STARTED` followed by `RUN_FINISHED`. Do not register the URL if it returns a normal JSON response or emits `RUN_ERROR`; fix the agent endpoint first.
        </Step>

        <Step>
            ### Connect to Copilot Cloud [#connect-to-copilot-cloud]
            1. Go to [Copilot Cloud](https://dashboard.operations.copilotkit.ai), sign in and click Get Started
            2. Click "Add Remote Endpoint" and enter the public AG-UI URL you verified above.
            3. If the agent name has more than one word, separate the words with underscores (`_`).
            4. Click "Save Endpoint"
            5. Copy the Copilot Cloud Public API Key

            <img src="https://cdn.copilotkit.ai/docs/copilotkit/images/copilot-cloud/crewai-flow-cpk-setup.gif" alt="CrewAI Flow Copilot Setup" className="rounded-lg shadow-xl mt-4" />
        </Step>

        <Step>
            ### Install CopilotKit [#install-copilotkit]
            First, install the latest packages for CopilotKit into your frontend.
            ```npm
            npm install @copilotkit/react-core zod
            ```
        </Step>

        <Step>
            ### Setup the CopilotKit Provider [#setup-the-copilotkit-provider]
            The [`<CopilotKit>`](/reference/components/CopilotKit) provider must wrap the Copilot-aware parts of your application.
            For most use-cases, it's appropriate to wrap the `CopilotKit` provider around the entire app, e.g. in your `layout.tsx`

            <Callout type="info">
                <LinkToCopilotCloud asButton={false}>Click here to get your Copilot Cloud API key</LinkToCopilotCloud>. Then, replace `<your-copilot-cloud-public-api-key>` with your actual API key.
            </Callout>

            ```tsx title="layout.tsx" showLineNumbers
            import "./globals.css";
            import { ReactNode } from "react";
            import { CopilotKit } from "@copilotkit/react-core/v2"; // [!code highlight]

            export default function RootLayout({ children }: { children: ReactNode }) {
              return (
                <html lang="en">
                  <body>
                    {/* Use the public api key you got from Copilot Cloud  */}
                    {/* [!code highlight:3] */}
                    <CopilotKit publicApiKey="<your-copilot-cloud-public-api-key>">
                      {children}
                    </CopilotKit>
                  </body>
                </html>
              );
            }
            ```
        </Step>
        <Step>
            ### Choose a Copilot UI [#choose-a-copilot-ui]
            You are almost there. Now it's time to setup your Copilot UI.

            First, import the default styles in your root component (typically `layout.tsx`) :

            ```tsx filename="layout.tsx"
            import "@copilotkit/react-core/v2/styles.css";
            ```

            <Callout type="info">
              Copilot UI ships with a number of built-in UI patterns, choose whichever one
              you like.
            </Callout>

            <Tabs groupId="component" items={["CopilotChat", "CopilotSidebar", "CopilotPopup", "Headless UI"]}>
              <Tab value="CopilotPopup">

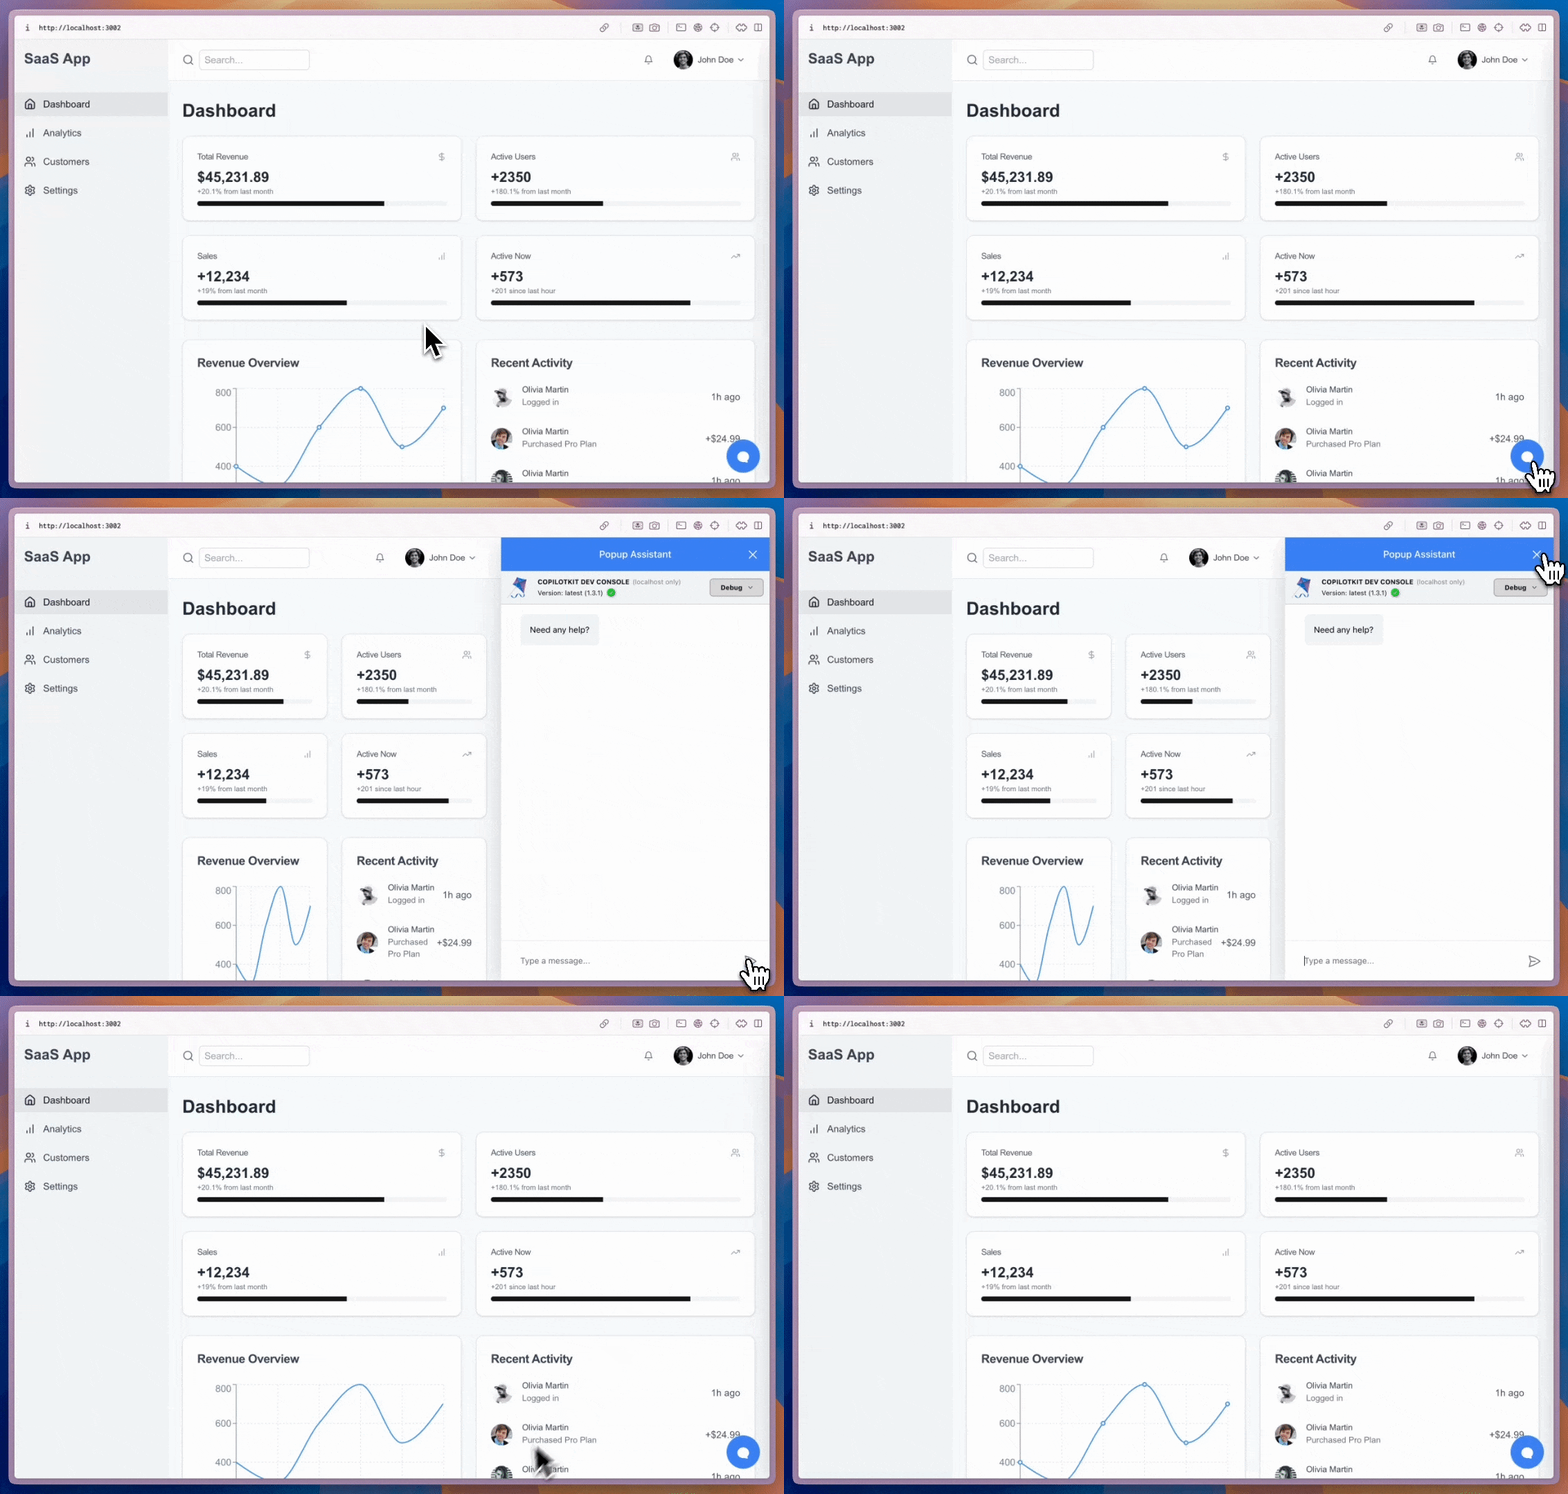
                `CopilotPopup` is a convenience wrapper for `CopilotChat` that lives at the same level as your main content in the view hierarchy. It provides **a floating chat interface** that can be toggled on and off.

                <img src="https://cdn.copilotkit.ai/docs/copilotkit/images/popup-example.gif" alt="Popup Example" className="w-full rounded-lg my-4" />

                ```tsx
                // [!code word:CopilotPopup]
                import { CopilotPopup } from "@copilotkit/react-core/v2";

                export function YourApp() {
                  return (
                    <>
                      <YourMainContent />
                      <CopilotPopup
                        labels={{
                          modalHeaderTitle: "Popup Assistant",
                          welcomeMessageText: "Need any help?",
                        }}
                      />
                    </>
                  );
                }
                ```

              </Tab>
              <Tab value="CopilotSidebar">
                `CopilotSidebar` is a convenience wrapper for `CopilotChat` that sits next to your main content. It provides a **collapsible and expandable sidebar** chat interface.

                <img src="https://cdn.copilotkit.ai/docs/copilotkit/images/sidebar-example.gif" alt="Sidebar Example" className="w-full rounded-lg my-4" />

                ```tsx
                // [!code word:CopilotSidebar]
                import { CopilotSidebar } from "@copilotkit/react-core/v2";

                export function YourApp() {
                  return (
                    <>
                      <YourMainContent />
                      <CopilotSidebar
                        defaultOpen={true}
                        labels={{
                          modalHeaderTitle: "Sidebar Assistant",
                          welcomeMessageText: "How can I help you today?",
                        }}
                      />
                    </>
                  );
                }
                ```

              </Tab>
              <Tab value="CopilotChat">
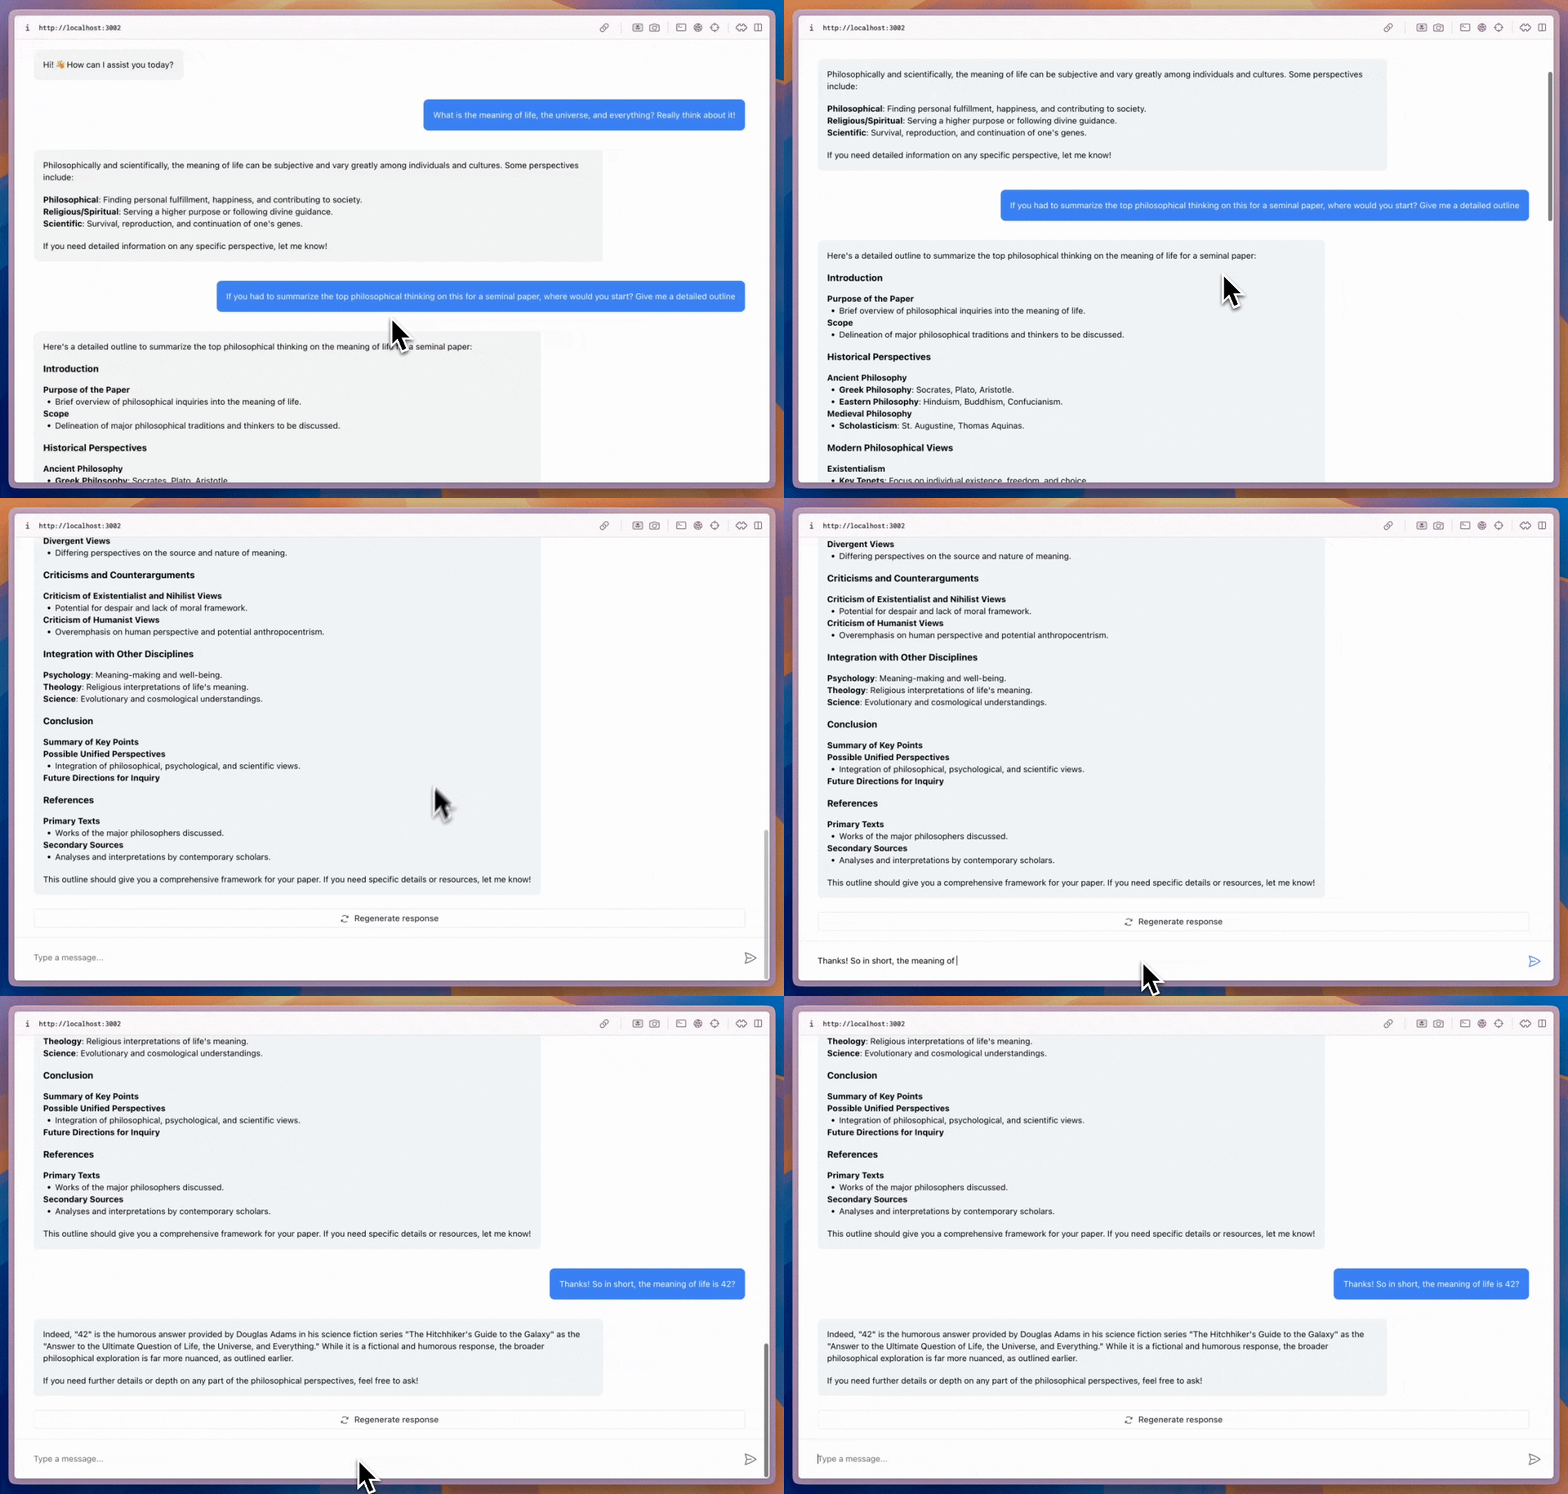
                `CopilotChat` is a flexible chat interface component that **can be placed anywhere in your app** and can be resized as you desire.

                <img src="https://cdn.copilotkit.ai/docs/copilotkit/images/copilotchat-example.gif" alt="CopilotChat Example" className="w-full rounded-lg my-4" />

                ```tsx
                // [!code word:CopilotChat]
                import { CopilotChat } from "@copilotkit/react-core/v2";

                export function YourComponent() {
                  return (
                    <CopilotChat
                      labels={{
                        modalHeaderTitle: "Your Assistant",
                        welcomeMessageText: "Hi! How can I assist you today?",
                      }}
                    />
                  );
                }
                ```

              </Tab>
              <Tab value="Headless UI">
                The built-in Copilot UI can be customized in many ways -- both through CSS and by using the slot system for component replacement.

                CopilotKit also offers **fully custom headless UI**, through the `useAgent` and `useCopilotKit` hooks. Everything built with the built-in UI can also be built with the headless UI.

                ```tsx
                import { useAgent } from "@copilotkit/react-core/v2";
                import { useCopilotKit } from "@copilotkit/react-core/v2";
                import { randomUUID } from "@copilotkit/shared";

                export function CustomChatInterface() {
                  const { agent } = useAgent();
                  const { copilotkit } = useCopilotKit();

                  const sendMessage = async (content: string) => {
                    agent.addMessage({
                      id: randomUUID(),
                      role: "user",
                      content,
                    });
                    await copilotkit.runAgent({ agent });
                  };

                  return (
                    <div>
                      {/* Implement your custom chat UI here */}
                    </div>
                  );
                }
                ```

              </Tab>
            </Tabs>
        </Step>
        <Step>
            ### Create a CrewAI Flow component [#create-a-crewai-flow-component]
            Place the following snippet in your **main page** (e.g. `page.tsx` in Next.js) or wherever you want to use CopilotKit.
            Set `NEXT_PUBLIC_COPILOT_API_KEY` to the Copilot Cloud public API key. Set `NEXT_PUBLIC_COPILOTKIT_AGENT_NAME` to the agent name that you saved.

            ```tsx title="page.tsx"
            "use client";

            import { useState } from "react";
            import { z } from "zod";
            import {
              CopilotKit,
              CopilotChat,
              useFrontendTool,
            } from "@copilotkit/react-core/v2";

            const publicApiKey = process.env.NEXT_PUBLIC_COPILOT_API_KEY || "";
            /**
             * AgentName refers to the Crew Flow Agent you have saved via CLI during setup.
             * It is used to identify the agent you want to use for the chat.
             */
            const agentName =
              process.env.NEXT_PUBLIC_COPILOTKIT_AGENT_NAME || "DefaultAgent";

            // Main Chat Component: Handles chat interface and background customization
            const Chat = () => {
              const [background, setBackground] = useState(
                "linear-gradient(135deg, #667eea 0%, #764ba2 100%)"
              );

              // Action: Allow AI to change background color dynamically
              useFrontendTool({
                name: "change_background",
                description:
                  "Change the background color of the chat. Can be anything that the CSS background attribute accepts. Regular colors, linear of radial gradients etc.",
                parameters: z.object({
                  background: z.string().describe("The background. Prefer gradients."),
                }),
                handler: async ({ background }) => {
                  setBackground(background);
                  return `Background changed to ${background}`;
                },
                followUp: false,
              });

              return (
                <div
                  className="h-screen w-full flex items-center justify-center"
                  style={{ background }}
                >
                  <div className="w-full max-w-3xl h-[80vh] px-4">
                    <div className="h-full bg-white/10 backdrop-blur-lg rounded-2xl shadow-2xl overflow-hidden">
                      <CopilotChat
                        className="h-full"
                        labels={{
                          welcomeMessageText: "Hi, I'm an agent. Want to chat?",
                          chatInputPlaceholder: "Type a message...",
                        }}
                      />
                    </div>
                  </div>
                </div>
              );
            }

            // App Component: Main wrapper that provides CopilotKit context
            const CrewAIFlow: React.FC = () => (
              <CopilotKit publicApiKey={publicApiKey} agent={agentName}>
                <Chat />
              </CopilotKit>
            );

            export default CrewAIFlow;
            ```
        </Step>
        <Step>
            ### Talk to your agent [#talk-to-your-agent-1]

            You've successfully integrated a CrewAI Flow chatbot to your application. To start, try asking a few questions to your agent.

            - Can you tell me a joke?
            - Can you help me understand AI?
            - What do you think about React?

            <Accordions className="mb-4">
                <Accordion title="Having trouble?">
                    - Try changing the host from `localhost` to `0.0.0.0` or `127.0.0.1`.
                </Accordion>
            </Accordions>
        </Step>

    <Step>
        ### Open Inspector and confirm setup [#open-inspector-and-confirm-setup-1]

        On localhost, click the Inspector button in the corner of the app.

        1. Open **Inspect**, then **Agent**. Your agent is listed.
        2. Send a chat message. Open **Inspect**, then **AG-UI Events**. Events are moving.
        3. Open **Rich Threads**. The list is unlocked (Intelligence is on), or locked with **Copy setup prompt** (Intelligence is off).

        More detail: [Inspector](/crewai-crews/inspector).
    </Step>

    </TailoredContentOption>
    </TailoredContent>
</Step>

</Steps>

---

## What's next? [#whats-next]

<Cards>
  <Card
    title="Implement Human in the Loop"
    description="Allow your users and agents to collaborate together on tasks."
    href="/crewai-crews/human-in-the-loop"
    icon={<UserIcon />}
  />
  <Card
    title="Utilize the Shared State"
    description="Learn how to synchronize your agent's state with your UI's state, and vice versa."
    href="/crewai-crews/shared-state"
    icon={<RepeatIcon />}
  />
  <Card
    title="Add some generative UI"
    description="Render your agent's progress and output in the UI."
    href="/crewai-crews/generative-ui/tool-rendering"
    icon={<PaintbrushIcon />}
  />
  <Card
    title="Setup frontend actions"
    description="Give your agent the ability to call frontend tools, directly updating your application."
    href="/crewai-crews/frontend-tools"
    icon={<WrenchIcon />}
  />
</Cards>
